302- EXCAVATION DEFINITION & METHODS
Excavation :
In the archaeological terminology, excavation is the process of exposing and careful study and recording of archaeological remains (cultural and biological) beneath the surfaces.
This is not just digging by a set formula but a carefully managed process that required constant creative thinking.
Excavation video
Significance of Excavation :
As a result of excavation recovery of traces in the form of house foundations, graves, bones, seeds, artifacts both movable or unmovable give an insight of the past human activities, which further adds to our understanding of the history of the region and help us to solve various history related problems. for example - setting the chronological issues. Finding cultural traits or establishing connection between different cultures.
Fixing a site for excavation :
choice of a particular site for excavation is not mere co-incidence but based on recommendation of the experts drawing on factors like the result of sudden findings, literary sources, detail study, exploration etc.
It is worth to notice here that Exploration is the most extensively used way to determine the excavation of a site, there are multiple types of methods employed under exploration, it includes physical inspection, remote sensing, and use of various types of modern equipment for the purpose.
Planning for Excavation :
Book name - Preparation of Excavation : "Archaeology from the Earth" Sir Mortimer Wheeler, 1954, pp. 131-135-141-142
" The experienced excavator, who thinks before he digs, succeeds in reaching his objective in a majority of cases. (1954:81)
1. Excavation campaign is not less than any Military campaign. It requires military level discipline from Archaeologists. Except his own role he should be able to play the role of a trainer, supervisor and administrator.
2. There have to be a valid purpose in mind before setting up any excavation and all members should be conversant of such goal, The aim could be to resolve any historical problem or to corroborate a historical theory/conception.
3. The leader has to form the team as per the objective of excavation. The requirement of expertise and number can only be decided by the nature of excavation. The team should be confident, having team spirit and full trust in the leader.
4. The Archaeologist must take notice of all factors such as climate, environment, location and accessibility etc of the site.
5. The Archaeologist should have knowledge of other expertise such as Draftsmen, surveyor, foreman and photographers, so that in case of exigencies the excavation work may continued with interruption.
Instruments needed in Survey and Excavation :
1. Theodolite
2. Dumpy Level
3. Leveling staff spirit level
4. compass
5. plumb bob
6. Steel tape, pocket tape
7. Pegs, survey poles
8. Parallel ruler, Steel ruler,
9. Folding scale, T-Squares
10. Nails
12. unstrechable string
13. Black and white background Cloth for Photography
14. Lighting for Photography
15. Three Filters (green, Yellow, Red)
16. Scales for various sizes for photography
17. Sheet of velvet (Black or Red) for photography
Tools
For Digging Operation
1. Large Pick axe
2. Small Pick axe
3. Small hand Shovel
4. Sharp edge spade
5. Bale Turf cutter
6. Closely knitted Basket
7. supervisor knife
9. Trowel (pointed as well as margin)
8. Brushes of various types and size
9. Pen Knife, Surgical Knife
10. Antiquity Envelope and plastic covers and boxes with cotton
11. Pottery labels
12. Epoxy, quick fix, plaster of Paris
13. Blower
14. Black and white paint, Marking pen
15. Magnifying glass
16. Plastic sheets
17. Mask and caps
Selection of Habitation mound
1. The director of the excavation must have visited the site several time in the past and should fix the excavation of the mound keeping in the view the contour of the map
2. Sampling : The area where the occupational debris of the mound is maximum will be the next choice of of the place to lay out a trench. The trench on the highest part of the mound will enable the excavator to determine the earliest time when the site came under occupation.
3. Laying out the trench in the central area of the mound should not be left out. Most important and elite occupation generally located in central part of the occupation.
4. Test Pit : It is the most useful way of obtaining preliminary information on stratigraphy and cultural history in advance of large scale excavation. This is known as reference point for the dig. Kent Flannery once called them as "Telephone Booth" as giving high specific information of the site.
Stratigraphic Excavation :
The concept of stratigraphy has been borrowed from another branch of science known as geology. under stratigraphy, archaeologist remove dirt/debris each layer wise. this gives them broad arena of understanding of various deposition over the period of time and each layer suggest of a gap in continuation of the habitation. These strata survive vary largely, depending on the type of location and geology (hilly, lowland, wet, dry, acid, etc., known as the terrain ). Excavation usually requires the removal and permanent dispersal of strata so they can never be reexamined. So the method is also influenced by the need to conserve cultural strata as far as possible. The method is most difficult and cumbersome but holistic in approach.
Mortimer Wheeler had written extensively on formation of strata and importance of its study in ancient India, 1946
Excavation Methods :
There have been wide range of excavation methods in use, some are largely outdated and become part of the archaeological history but some have become more refined and advanced over the period of time and now being utilized all over the world as a norm with slight regional variations suitable to terrain and climatic conditions.
As per Sir Mortimer Wheeler, "Archaeologist is a great destroyer, and excavation is destructive in nature".
According to renowned archaeologist Kent Flannery "We are the only scientists who murder their informants when we question them !"
All contents excavated are removed from the ground for further study and destroyed forever by permanently divorcing from their contexts in time and space. This is one of the tragedies of the profession of archaeology. Thus, the ethics of archaeology always insists on minimal excavation and maximum collection of scientific information.
Trenching : trenching has been used to obtain cross sections of sites and is particularly important in stratigraphic interpretation because it provides a single, long vertical profile. Trench method is also useful in exposing buildings buried underneath later structures.
1. Trial Excavation:
As stated above, trial digging is undertaken to notice the true nature of the ancient remains of a site, which is also known as ‘trial trenching’ or ‘sondages’ It is generally taken up at the top of the mound at a place, which is least disturbed on account of pit activities. A square trench measuring 3 meters by 3 meters may be taken up for digging. Wooden square pegs must be placed in all the four corners of this square trench. The digging should be taken up to the natural soil to know the beginning of the sited occupations as well as the sequence of culture.
Whatever is unearthed during the course of excavation should be carefully recorded, noted, photographed and plotted, for, it is going to from the basis of a large scale excavation. It can be conducted speedily as the excavator is required to reach the natural soil early.
2. Vertical Excavation :
The aim of the Vertical excavation is to not expose the site itself but to prepare an index of the site, like the page of of the contents of a book. It is very often used for the purpose of knowing the stratification of the site. Archaeologist resort to this kind of excavation to know the sequence of cultural occupation of the site. The area of vertical excavation is generally limited and can only be extended vertically.
" It is a railway time table without a train." - Mortimer wheeler Arch. from the earth 1954 pp. 167
 |
| Basic layout of a vertical Trench system |
a) Selection of a datum point -
This is a control point for all future excavation drawing a line considering a cardinal direction. First of all a straight datum line is drawn considering the datum point using terminal pegs and thread.
b) Reference point -
Now consider a reference point on datum line. the line drawn from reference point perpendicular to the datum line is known as reference lines. It would fall at right angle. draw another line on datum line parallel to reference line at a distance of 5 meter/10 meters (depending upon the requirement). The length of the reference line would be equal to 5/10 meters, hence forming an exact square grid. The overall site grid is divided into smaller grids which are parallel to the site reference line. Mortimer wheeler introduced "Grid System". The grid system gives greater control of the excavation pit to the archaeologist, In this system the site is laid with a grid of squares with strips of undug area known as baulk between them. The width of baulk is considered 0.50 meters. The Baulk is helpful since it holds all the peg on the ground, also it is helpful in walking across the digging trench.
Along the two sides of the trench, strong square wooden pegs should be firmly driven into the ground at an interval of one meter each in an east to west orientation (or North-South). Their faces should be set diagonally to the trench and peg at reference point be marked as zero (0) peg, and the other pegs serially numbered in Roman numerals I, II, III, IV etc. On the other side of the trench also pegs should be fixed at similar interval and numbered as, I', II', III' so on, etc.
c) Extension of Vertical trench :
The vertical trench of 5x5 can be extended further upward or downward in grids of 5x5 meters each, but it can not be extended horizontally. hence, there is a limitation in excavation. The vertical excavation is very useful in exposing structures and walls.
Three dimensional measurement of the artifact in the trench :
The location of pottery and its sherds found from trenches are not required to write in the report but the in situ position of other artefacts are recorded inevitably. There is a well define method of writing 3-D position of the artifact also called as locus.
Suppose in a vertical trench, where reference peg is : 0
Now, suppose the nearest peg to the in situ position of artefact in trench is peg III and vertical distance from Peg III is .60 mtr and Position of artefact from Datum line is 3 mtrs. The artefact in situ position is 7 mtrs below reference peg.
Then, locus would be
III-6 mtr x 3 mtr - 7 mtr ( BELOW or ABOVE) REFERENCE POINT
 |
| Vertical trench example, british iron age hillfort site society of antiquary britain |
3. Horizontal Excavation : This is also known as Area Excavation. The aim of this type of excavation is to reveal and understand the detailed planning of the township with its streets and all structure with in its perimeter, such as shrines, houses, palaces, pools, shops etc.
Horizontal excavation leads to complete reconstruction of the cultural pattern of a particular period. Thus, there is no limitation in area extension. This means, horizontal excavation involves high expenditure and is quite consuming process, It necessarily requires numerous specialists, experts and experienced site supervisors assisted by trainee supervisors ready for hard work and toil, capable photographers and draftsmen. All of them are a must for such a type of excavation.


Horizontal Excavation Lay-out
Grid Pattern: Before under taking actual digging of the site, it is necessary to prepare a plan of the site by dividing the entire area proposed to be excavated into several serially arranged square trenches, which is known as laying out the grid pattern. The grid pattern is followed in almost all modern excavations like at Kausambi, Nagarjunakonda, Kalibangan, Hastinapura, Lothal, etc.
Grid Numbering:
In this method, again a datum line is drawn as per the cardinal direction. on this line a center point (Reference Point) is selected. This Reference point corresponds approximately to the centre of the mound. A perpendicular line is drawn intersecting the datum line at reference point is called as reference line. Now As two lines intersect each other at right angle, we get four quadrants, from this reference point lying south west is x, north west is Y and North east quadrant is Z quadrant respectively. The south east area is not assigned any such denotation. While numbering the grids in respective areas are prefixed by the quadrant alphabets (X, Y, Z). Each grid is a perfect square of 5x5 or 10x10 meters size. Horizontally, the points after 5 or 10 meters are assigned the alphabets A, B, C, D......and so on. and vertically, the points after 5 or 10 meters are assigned the same alphabet followed by numbers. such as A1, A2, A3...OR B1,B2,B3 SO ON
a lay-out based on a square as a way that a baulk (unexcavted area) is left between each pair of adjacent squares until the extreme end of the work. The individual square, called a trench is a clearly defined sub-unit for record and supervision. These trenches are further sub-divided into four equal units knows as quadrants. With 50 cms. Baulk in between them. Supplementary squares can be added in any direction in accordance with the developing needs. \Without effecting the previous lay-out the supervisor should retain in each square a complete section, if a structure, pit or any important object comes out in the middle of the quadrant, a section should be maintained to connect it with the baulk of the trench or quadrant.
Three dimensional measurement of the artifact in the trench :
The location of pottery and its sherds found from trenches are not required to write in the report but the in situ position of other artefacts are recorded inevitably.
All important objects like coins, beads, ornaments, metal objects, figurines etc. should be recorded in three dimensional manner.
There is a well define method of writing 3-D position of the artifact also called as locus.
Suppose in a grid A1-A2-B1-B2, upper left Peg is : A1 and Lower left Peg is : A2
Now the distance of object from A1 is 6 mtrs
and the distance of object from A2 is 2 mtrs
Then, locus would be
A1-6 mtr x A2-2 mtr -+ 3 mtr ( BELOW or ABOVE) REFERENCE POINT
 |
| Horizontal excavation site Mohen-jo-Daro |
BURIAL EXCAVATION :
Megalithic Burials were earlier excavated by Step method but due to some pitfall it has been forsaken by modern archaeologist and a new and more refined method has been adopted is known as Quadrant Method.
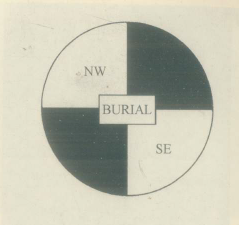


QUADRANT METHOD :
provides both horizontal and vertical cut at the same time Used on any circular feature like barrows, post-holes, hearths, pits
This is quite quick process which involves dividing a feature into quarters and excavating 2 opposing quarters simultaneously which enables stratigraphy in 4 directions.
if a layer is seen in all 4 sections, it's likely the layer was throughout the feature
if nothing of interest is found then there may be no need to dig the rest of the burial.
if there is something of interest (e.g. part of a skeleton) found that is partly under the sections left in place, the remaining quadrants may also be excavated used at Caer Alyn.
DRAWINGS AND MAPS:
Before commencement of the excavation, a contour map of the site should be prepared. Similarly after completion of the excavation, plan and sectional drawings of the site should be prepared. These maps should show all the elevations, plains and subsidences on the site. Such maps are helpful in studying the fortifications if any and the plan and extent of the habitation etc.
When the excavation is in progress, drawings of the objects and buildings should be made with reference to the trenches. These should be made according to scale preferably in 1:20 proportion. Apart from this, section drawings also should be made of the different layers that are discernible in the baulks.
PHOTOGRAPHY: Photography is one of the easiest and accurate method of recording. A good photograph would present an impression which cannot be presented even by hundreds of pages of description. Because of this archaeological photography assumed significance and has become an indispensable tool in the hands of an archaeologist. Before taking pictures, the area should be neatly spruced up without any unduly disturbing features like foot prints, excavation equipment and tree and plant roots. A photograph also should contain a scale - either linear, human or any other object appropriate to the situation. The area to be photographed should be uniformly illuminated by the natural light. For this reason, photographs should be taken either early in the morning or late in the evening. Since these photographs are going to be used for publication, they should be processed and printed carefully to obtain high quality results.
RECORDING OF EXCAVATION
Technically, excavation of any site means destruction of the site after which it is impossible to return the original object/structure to its original place. Thus, the excavation process is irreversible in nature. Hence, it is very important for an archaeologist to record every object with all care and details as possible before it is removed from its place, so as to enable the excavator to reconstruct the complete picture of the excavation site faithfully.
Some pre-requisites
1. -Before the excavation of the site, the contour and site maps incorporation the environment must be prepared.
2. -Maximum number of general views from all angles should be recorded.
3. -Photography of the site and material in situ must be taken invariably.
After the excavations has started, the next job of the excavator is to mark the pottery and artefacts with proper labels carrying all the necessary details.
Labeling of Pottery : (Vertical Excavation)
1. First line should be : Date of digging
2. Second line should be : name of site (3 letters only) followed by trench number
3. Third line should be: Area (locus) between pegs, where the pottery has been found
4. Fourth line should be: Depth at which the pottery is found recorded from reference peg. Followed by the stratum number (layer number)
Labeling of Pottery : (Horizontal/ Grid Excavation) : -
All labels should be same as Vertical excavation only change will be in second line, instead of trench number, the name of the grid will appear.
Labeling of Pottery : (Horizontal/ Grid of Burial) : -
Incase of Burial, all labels will be same except the second line, area of excavation will be serial number of burial eg. Megalith 1,2,3 or Cist 1,2,3 etc
Recording of Antiquities :
Recording of Antiquities is not as simple as the pottery. For antiquities, 3-dimensional measurement is taken carefully. And system of 3-D measurement varies in both Vertical and Horizontal excavation.
Labeling of Antiquities in Vertical excavation :
1. First line should be : Date of digging
2. Second line should be : name of site (3 letters only) followed by trench number
3. Third line should be: Area (locus) between pegs, where the antiquity has been found
4. Fourth line should be: 3-D method- straight vertical and horizontal line distances between the object spot and nearest peg counting from reference point. Followed by measurement of depth of the spot from Reference peg.
5. Fifth line should be : stratum number or layer number.
6. Sixth line should be : Type of object
Labeling of Antiquities in Horizontal excavation :
In case of horizontal excavation the recording of measurements is done differently. Here, recording of the object find spot is done directly corresponding to the reference peg. This method of recording measurement in square trench is called triangulation method.
1. First line should be : Date of digging
2. Second line should be : name of site (3 letters only) followed by Area number
3. Third line should be: Grid in which the antiquity has been found
4. Fourth line should be: Triangulation method- Distance from two nearest vertical pegs is measured and write down with reference to the respective pegs followed by measurement of depth of the finding spot from Reference peg.
5. Fifth line should be : stratum number or layer number.
6. Sixth line should be : Type of object
Some other important points :
- Prepare sketches and measure drawings in the site note book as required.
- Plan of each pit encountered during excavation must be drawn on the graph sheet available in the site note book.
- Preparation of sketches of the layers.
- Proper and detail Note book is most important. Every detail should, therefore be recorded in the manner most conducive to facility of reference.
- When the excavation come to close the director of the excavation dictates comprehensive notes on the site for preparing final report.
Archaeological Drawing :
1. Preparing the drawing of the sections exposed by the trench
2. Preparing the plan of the structures exposed during the course of excavation
3. Preparing drawing of the pottery
4. Preparing drawing of other important antiquities found in excavation.
1. Section Drawing : -
Preparation of the section drawing is the most difficult and requires a sharp intelligence and keen observation. It is vital since it can reveal a brief history of the occupational remains at the site at a glance. Knowledge of principle of stratigraphy is a pre-requisite for section drawing. It includes following things :
i) Number of successive occupational periods at the site
ii) Number of structural phases, working level, foundation trench and all floor levels.
iii) Important compositions of the layers and any other important evidence.
- Section drawing always prepared on square sheets or roll.
- Use of inflexible string in fixing of datum line with the help of spirit level.
- Iron nails at frequent intervals are fixed in the exposed section at a considerable height with the help of dumpy level. All these nails should be kept in one level and the same line serves as datum line for taking measurements. All measurements must be taken from the datum string.
- These nails should be place sufficiently below the top surface of the trench, so that the same are not susceptible to easy tempering.
- From this datum line, vertical string at right angle can be tied with plumb bob for recording the measurement of the stratum.
- Lines drawn in such an order to delineating the distinction of the successive strata with their characteristics.
- Not only should lines of demarcation be transcribed from measurement but also the size, shape and position of brick bats, bones, sherds or other materials which become nature of the stratum and characteristic of the soil should be drawn clearly.
- Symbols for each section, should be carefully drawn referring the uniform system of symbols for various compositions of the soil prepared by Sir Wheeler.
- The numbering of layers should be evenly distributed to various parts of the sections, keeping in view the preparation of blocks and reduction of the size of published chart.
Some important considerations :
- In most of the cases scale chosen by draftsman, should be 5 cm for 1 meter. Hence, the picture will be drawn 20th times smaller of the original. Hence, minute details should be drawn very carefully on the miniature drawing.
- The outline of the pit should be clearly marked along with the sealing layer.
- The working level of each structure along with its foundation trench as also various floor levels are to be distinctly brought out.
- As far as possible the material used in preparation of the floor should be indicated clearly.
- The line of the natural soil followed by the top layer of a particular period are to be marked with bold line.
- In case of Vertical excavation, only one section of the exposed trench is drawn.
- In case of Horizontal excavation all four sections have to be drawn, whereas director can decide later to publish only two of them.
- The section should incorporate the maximum possible evidence including structures and floors to reveal the story of the ancient occupation at the site.
- The period and the structural phase of each structure must be indicated in the section.
Stratigraphy https://www.youtube.com/watch?v=HUwgQbY5GS0
2. Drawing of Structure
Drawing of structure is to be prepared on plain good drawing paper. Before venturing into preparation of the plan of the structure, the draftsman must understand the nature of the construction fully as also its purpose.
Such as: Residence, Shrines, Granary, cistern, fortification etc. every type of structure has its own characteristics.
i) The placing of each and every burnt brick, Mud-brick or stone used in any structure and their alignment should carefully and accurately shown in the plan.The firm edges of the bricks and stones will reveal the thickness of the mortar used.
ii) The draftsman must be able to distinguish the various phases of reconstruction and indicate them clearly with the skill at his command.
iii) For measurement of structures and other remains in plan, the simple method of triangulation is to be followed. Two points at a convenient distance from the part of the structure should be fixed as datum points. These two points falls on the two sides of an isosceles or equilateral triangle considering the third point on the structure itself. Similarly, different points on the structure measured corresponding with the earlier two datum points and hence, the measurement is appropriately used in drawing the structure.
iv) The period to which the structure belongs and its structural phase must be marked in each section.
v) A line indicating the alignment of the section also should be drawn. Cardinal direction in which the structure was raised is also essential
vi) On an exaction of large scale, the plan of the structures will have to be prepared individually, exact location of the structure, Key plan on smaller scale and path ways should also be incorporated.
vii) While preparing plan of the fortification wall a rampart care should be taken to reduce the scale size as to fit entire fortification should fit with in the sheet of the paper without losing essential details. Gateways, cells, moat, trenches, barracks, palace, residential areas all should be marked clearly.
viii) In case of dockyard, various components like the entrance gates, berthing place, placeofloading or unloading, store rooms etc. needs incorporation in the plan.
3. Drawing of Pottery:
i) Pottery should be drawn on scale to scale basis except for those which are exceptionally large.
ii) To draw a pottery the rim part is most appropriate piece
iii) The diameter of the rim or any other convenient part of the fragment of the pottery is to be determined by rotating the same on a number concentric circles pre-drawn on chart for this purpose. The diameter is every circle is already given on the chart. The circular mouth of the rim fits perfectly on which circle, the diameter of that circle is noted down.
iv) A line of same diameter is drawn horizontally, on separate drawing paper.
v) The same line is bisected perpendicularly, the perpendicular line drawn vertically below the horizontal line.
vi) The left half of the area is meant to show the details of the section and the right hand is reserved for the details of elevation.
vii) After fixing the pot sherd/rim in proper position all essential details and curvatures can be measured with the help of set squares, compass, calipers and scale against a perpendicular line drawn at the left-hand extreme of the horizontal line.
viii) The set square should be placed at right angel to the surface on which the pot has been fixed with the edge touching the rim of the pot.
ix) The paintings or any other decorations on the interior part of the vessels should be depicted on the left half side and those on exterior part on the right half side.
x) The striation marks or grooves should be carefully shown with the help of single or double lines.
xi) The Thickness of the pottery fragment known as section is to be shown on the left-hand side by means of curved lines. The curvature should be exactly the same as the curvature of the fragment of the pottery.
4. Antiquities Drawing
The drawing of antiquities like Stone tools, terracotta seals, coins, designs, beads and other important artefacts should be done keeping in view the most important part of them. In case of tools and implements particular care is required to exhibit the working edge. Greatest artistic skill of a draftsman is needed in preparing the drawing of terracotta. Various expressions on various terracotta pieces are to be faithfully rendered. Measurement of antiquity is not very difficult. For stone tools the profile and section drawing somewhere similar to the drawing of pottery. The antiquity can be kept on the sheet of paper and outline drawn. Thereafter the outline can be filled in with all the required details by means of hatching and strokes.
Harris Matrix
Law no. 1: The Law of Superposition
Layer on top is younger or more recent than the one below which more recent
Law no. 2: The Law of Original Horizontality
Law no. 3: The Law of Original Continuity
Law no. 4: Law of Stratigraphy Succession
Harris Matrix:
Chronologically arrange the layers based on some principles
i) Two stratigraphic units have no connection, represent separately
ii) Superposition, one is below and vice versa relationship between two layers
iii) co-relationship : No connection together but had relationship in past.
Drawing of Pottery (https://www.youtube.com/watch?v=md4aBIrDRCw)
Pottery Drawing :https://www.youtube.com/watch?v=uOes844UTKY
Stone Tool Drawing https://www.youtube.com/watch?v=c4WGndJEjXw
https://www.youtube.com/watch?v=1g42fC8ysFw
Site Photography/ Digital Archaeology
TYPOLOGY : CLASSIFICATION OF ARTIFACTS AND GROUPING
ARCHAEOLOGICAL QUANTIFICATION TECHNIQUE

Comments